Pages

Wednesday, November 28, 2012

Compilation of Other Coin Chart Ideas

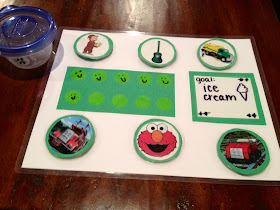
After MONTHS of saying I'm gunna post about others who have made the Behavioral Coin Chart, I've finally got a post together! Most of what I've gotten in emails from people are of their charts and some of how they changed it to make it work for their child! Everyone has GREAT ideas and I LOVE getting photos from everyone who has made a chart for their child!

Cari, a mother and fellow blogger, Reach for Star Berries, got in contact with me MONTHS after implementing the behavioral Coin Chart System with her 4 year old daughter. This is what pushed me to get this post out because up until now I only had pictures of charts and not too much feedback on how the charts have been working for the families over time! 
Here is what Cari wrote to me: "I found this back in June and posted on here that I would come back and post images of our chart. I'm featuring the chart and how I made it on my blog next week. We've been using it for about 5 months now and love it! I took your ideas and ran with them and have told all of my mommy friends about your idea. Thanks for sharing with us."  
Below are pictures of her chart and you can click HERE to read her post!
   

Here are a few more examples of what others have done! Even if you don't follow my Behavioral Coin Chart exactly, the basic idea of it is a wonderful system to implement with ALL children! I hope seeing what others have done will help you change it up and make a chart that works for you and your child!

Emily is a Nanny for a very lucky 3 year old girl....
She made a Hello Kitty Chart and wrote about the changes she made.
"I have made some changes:

1) I have listed daily activities she must complete (getting dressed, breakfast, brushing her hair, walking to school, etc.) and she can earn a sticker for completing these tasks well (i.e. not screaming for mom, no crying, no arguing). When she earns 5 stickers in EACH task, she earns an extra sticker towards her goal.

2) She earns 1 sticker (Hello Kitty, of course!) towards her goal every day that she keeps all 6 coins, same as your chart.

3) I've laminated the whole chart so we can peal off the stickers when she's completed it and I've used dry erase markers to write the daily activities so as she grows or the tasks become too easy we can change them. 
4) I've used Velcro to hold the coins on instead of pockets, I had some around and I couldn't be bothered with making pockets hahaha. "


Ali wrote,
"Thanks for posting this! My 4 year old was in desperate help! As is my sanity! This is my version! :-)" At the top of the chart she wrote out Rainbow Rules for Good Behavior.

Ashleigh writes how she made her chart for her daughter:

"Here's how ours works: If she has ALL 5 coins at the end of the day she gets a sticker in the box. 10 stickers = goal. She also gets however much money her coins equal each day (so if she has 2 coins left=20 cents, 5=50 cents, etc). She writes that amount each day (which she will count the following morning - before we "reset" them - so that we can take a coin away if she doesn't go to bed good) and gets paid at the end of the week. Her coins can be lost for bad behavior or gained back for good behavior. IF she loses ALL of them it's a loss of ALL privileges for the day. Getting all her chores done is equal to a coin as well. Also, if she loses them ALL then she can not gain them back for that day. She starts fresh every day. 

THANK YOU AGAIN.  SO MUCH!!!"


Med made her chart all dry erase for her 2 1/2 year old son! She blogged a little about it HERE and she also writes about how she made her chart HERE!

Katie has been using this chart with her daughter since October and she has also blogged about how it works for her YOUNG TODDLER, who is only 2 1/2 years old! Check out her post HERE!

"Thanks again for your advice, we're only on day 1 so we'll see how it goes, so far she loves her coins and doesn't want to give any of them back when she makes a "bad decision"! Ha ha, almost 3 and stubborn as a mule!  Her first goal is for her toenails to be painted pink "like mummy!" :)"
~Zoë~ 


Lastly, I don't have a picture of the chart Dalia made for her daughter but I will leave you with what she wrote to me, 
"I just have to say THANK YOU!!! I was nearly at my wits end with my 5 year old daughter. I was really considering therapy for her behavior. I saw your behavior chart on Pinterest and gave it a try. I made almost an exact duplicate. Words cannot express the miraculous turn around in behavior! It is absolutely amazing. I actually overheard her say, "I'm not going to do that because I don't want to lose a coin." I was stunned. Pleasantly so. She earned her reward in 12 days and is such a pleasure to be around now. Thank you, thank you, thank you for creating an amazing behavior chart."

Saturday, November 24, 2012

3D Paper Snowflakes& Gift Wrap Ideas

I am so excited to post about these beautiful 3D paper snowflakes! They are so easy to make but look so complicated! People will be amazed you made them!!! 
Here is all you will need:
  • 6 square pieces of paper, regular paper not to thick
  • a pair of scissors 
  • pencil and ruler
  • tape, hot glue, or stapler
  • *OPTIONAL* paint
  • *OPTIONAL* Sparkle Mod Podge

You will start off with 6 square pieces of paper. The size of square will determine the size of your snowflake. 
Fold the paper in half to make a triangle. You want to measure/draw out three lines as pictured below.
*Links to printable below
 You want to erase the center because it it very important that you leave a little space between connections!
 After doing a little research I found an AWESOME blog called Ellinee Journal and Lia has done all of the work for us by creating a free printables of this pattern!!!
Click on the size of snowflake that you want: LARGE, MEDIUM, SMALL!

 Once your lines are drawn(printed out), you can make this more of a project with your children by letting them paint on the blank side of the square. I just gave my kids a bunch of different shades of blue paint and Qtips as paint brushes. They loved painting with Qtips and it was great because they didn't get gobbs of paint on the paper! I told them to keep it thin!
 Another optional step but one that makes it look SO PRETTY is, after the painted side dried, I gave it a thin coat of Sparkle Mod Podge! If you have never used SPARKLE Mod Podge before you are missing out!!! It is SO much better than adding messy glitter to a project and it covers the surface in beautiful sparkles! The pictures don't do it justice....The second one kind of shows off the shine!
   
 Let it dry...it only talkes a few minutes...then fold and cut on your lines! When you open it up, this is what it will look like!
   
 Since I was already using Mod Podge, I also used it to do this next step in place of glue or tape. Roll the first two innermost paper lines together to form a tube. Then tape or glue together. If you are using Mod Podge, you only need a tiny drop between the sheets and it just takes a minute to dry and hold!
Then flip your paper over and repeat to the next set of lines, and repeat two more times until it looks like the picture on the right!
   
 Once you have all six squares done you are going to connect them. I took three at at time and I used hot glue because it's fast and easy! You can also use tape or a stapler for this step! Connect all three at the bottom and then at one place on the side.
   
 Then connect the three and three together!
   
 So simple and so beautiful! This 3D snowflake will bring a bit of winter magic into your home! Hang it from the ceiling or tape it to the walls!
You can also use fun sheets of christmas scrapbook paper and use that instead of painting one side!

 Also, you can make these in a smaller version to add beauty and charm to the wrapping of a special Christmas present, instead of a bow!
 On the topic of Gift Wrap, I thought I would give you a few more fun ideas using paper for embellishing your Christmas gifts! Hope they help you get creative when wrapping presents for your loved ones this year!

Cupcake Paper Carnations
Accordion Fold Christmas Tree
Cute Polar Bear With Tag
Dove
BIG Newspaper Bow
Paper Pinecones
Paint Sample Gift Tags

Thursday, November 22, 2012

Roasted Brussel Sprouts Medley

Happy Thanksgiving Everyone!!!! I hope you all have had a great time hanging out with your family and friends AND you have had some GREAT food! This year I decided to make this really simple and yummy vegetable dish and when I posted a picture on Facebook a few of my friends asked for the recipe. So I decided to post it here! 

If you don't know or have never seen it before, this is what Brussel Sprouts look like on the stalk! Brussel Sprouts are a cultivated bunch of wild cabbage that are selected for their leafy and small green buds which look like mini cabbages! Brussel Sprouts, as with broccoli, contain sulforaphane, a chemical believed to have potent anticancer properties. They are also a source of indole-3-carbinol, a chemical which boosts DNA repair in cells and appears to block the growth of cancer cells! They are also a great source of Vitamin C!
 Roasting these little cabbage like veggies are a prefect way to enjoy the health benefits and flavor at the same time!

Here is what you need:
  • 1 1/2 Pounds of Brussel Sprouts, trimmed of the stalk and cut in half
  • 4 medium carrots, peeled and cut into 2 inch pieces
  • 2-3 garlic cloves, peeled
  • 1 small red onion, chopped
  • 3 Tablespoons of Olive Oil
  • 1-2 Tablespoons of chopped fresh Rosemary
  • 1 Tablespoon fresh Chives
  • 2 teaspoons salt
  • 1 teaspoon pepper
Preheat your oven to 375 degrees.
In a large bowl, combine brussel sprouts, carrots, garlic, & onion.
Drizzle with Olive Oil, stirring to coat.
Add rosemary, chives, salt, and pepper.
Put mixture on a foil covered cookie sheet!
   
 Bake until lightly browned, about 30-45 minutes. Stir occasionally.
Serve warm from the oven! YUMMY!!!

I wanted to add what I am especially thankful for this year! 
Our FIRST Thanksgiving with our sweet little Garren & HEALTH!!!
What are you especially thankful for?

Saturday, November 17, 2012

Christmas Countdown & Other Ideas

 The kids have been asking and asking how many days till Christmas! They know it's after Thanksgiving but it's always good for children to have a tangible way that they can actually SEE how many days until the specific event they are waiting for is. I usually make a paper chain but this year I wanted to make something that looks cuter! So instead of paper links I made little Christmas lights!

With this Christmas light string, your kids can count the lights till the big day arrives! Just simply cut away a light each day! I also wrote on the lights when specific things are happening. For Example, there is a light that says Thanksgiving on it!

All you need is different color construction paper, ribbon, tape, glue stick, and a stapler!
Simply draw light shapes on paper and have your children get some fine motor skill practice by cutting them out!
   
 Then cut a bunch of little black squares, one per light! We used a glue stick to glue the black squares to  make each look like little lights!
   
 Then I took my ribbon and stapled the lights to it!
Every other light or so I added a little piece of tape to stick it to the wall the way I wanted it! We also made a little sign at the end of the light chain that said "It's Christmas! Happy Birthday Jesus!" 

Only 39 days till Christmas! =)
Another fun and simple way I decorate our home for the holidays is with silver ornaments on a string hanging from the ceiling. I bought two or three packs of different size plastic ornaments and also silver bells from the Dollar Store! This is the Fourth year I have done this so I've lost a few ornaments over the years! I am planning on adding more but here is what my entryway looks like. This picture doesn't really do it justice.....
 I used puffy paints to put a little design on some of them and tied ribbon in different lengths to each ornament. Tack them to the ceiling wherever you want to add a little Holiday flare!
 Lastly, I know many of you have already seen my idea of a Keepsake Christmas Tree Skirt! I wanted to show you a picture with this years handprints on it! My first year with THREE kids hand prints! I love how little Garren's hand is here and I know I will always treasure that I got this! Jason and I were also talking about how we should have our handprints on the tree skirt at least in one place. So we added our hand prints by the trunk. On top of them we wrote Mommy & Daddy. 
Hopefully these ideas inspire you to bring a little Christmas to your home, without spending a lot of money! What are some decorations you have come up with for the Christmas season that don't cost a lot of money?

Tuesday, November 13, 2012

Thanksgiving Conversation Rolls

 Here's something fun to keep the conversation at Thanksgiving interesting!
Both kids and adults will have fun with this one!
Simply get any roll of refrigerator biscuit or crescents. It just depends on what your family prefers. You could make homemade rolls but I'm sure you already have lots of things going on in the kitchen so simple is best!!! 
Along with your biscuits, write out conversation questions, on regular white paper with a pen, to go in each. Or even better, type them out because it's easier to read!
Butter up your paper and add them to the dough before you roll them up!
Bake as package says!
   
 Here is my boy opening up a roll to find a question!
Tip: Let people know that there is something inside the roll so they don't just bite or rip right into the roll and mess up the question paper!

Here are a few fun ideas for questions when there are adults and kids both in the conversation!
~What would you grow up to be or change about your career if you could do it now?
~If you had $100 to give to ANYONE, who would you give it to and why?
~Speaking of Holidays, what is your favorite part about Thanksgiving?
~My favorite musical group is_______. Why?
~What is one of your favorite books? Why?
~What is one of your biggest wishes?
~What are you secretly proud that you can do?
~What do you remember getting in BIG trouble for?
~What is your favorite thing about someone you are sitting next to?
~If you had a superpower, what would it be and why?
~What common household things are you thankful for?
~What would you like to be thankful for NEXT year at this time?
~Would you eat a turkey that fell on the floor?
~What non-meterial would you like to get/give this Holiday season?

I hope you all have a great time eating and talking and hanging out with your family and friends!
Here is one more idea for Thanksgiving day, that I blogged about last year! It's a simple craft/game for the kids in your life! Click on the picture to find out how to make these cute turkeys and play the game!