Friday, October 26, 2012

Trick or Treat Sack AND Keepsake!

 I went to a Halloween event with my kids and I was wishing I had sacks for them! I mean, we have the normal plastic buckets which are so cheap that they can break if your child plays with them too rough! 
They cost a fortune and all for a character that your child might not even like next year! I mean, come on, how much are we already spending on the costume!?!
They are also annoying to store for the year to come because they are too bulky! 
"Why haven't I just made some kind of sack for them!?!" I thought to myself.
They can use the same one each year! If it gets dirty, it can be washed! If it rips, it can be sewn! It can, also, simply be folded and stored away, taking up no space in the Halloween bin! 

Ok, here is were this idea becomes genius!

You know all of those CUTE hand/footprint ideas for Halloween! I am a sucker for those like most moms BUT what am I going to do with them? If they aren't framed, they will be ripped up as the years go on! I am, also, not one of those people who like to keep stacks of papers....
I admit, I throw away most of my sons school papers immediately after looking at them out of the backpack, even the art (I'll normally just take a picture of the cute stuff). 
Also, I have THREE kids!!! That can add up!

However, Combine the Trick or Treat sack with hand or footprint art and I'm SOLD!!!
Every year choose a different hand or foot print idea and paint it to your child's sack, along with the year! What a GREAT way to have the keepsake art and also put it to use! I am now just so sad that I haven't thought of this sooner for my big boy Brenden, but glad I thought of it soon enough! It's never too late to start, unless your kids are too big to trick or treat, then save this idea for your grandchildren! Also, if your child is older, maybe you will want to choose a hand AND footprint idea for each year so their sack will be totally decorated in a few years!
Here's all you need:
  • A pillowcase per child (I chose white)
  • Fabric paint (slightly watered down acrylic paint works just the same)
  • *Optional* Fabric markers
First, I taped off a section that my kids could decorate around where I drew their names. I used fabric markers for this part!
 Since this is our first year doing this, I wanted them to chose a foot AND handprint that they wanted! Here's what they chose! Kiki wanted her pumpkin at the bottom of her sack and Brenden wanted his spider at the top of his sack! I am so pleased with how they turned out! They are SO CUTE! I used Glow in the dark puffy paints in the spiderweb, for the spiders eyes, and for the dates!!
 Here is Kiki with her new Trick or Treat sack! If you don't want it as large, you could just cut some material off the top, fold over and sew. If you don't have a sewing machine you could use hot glue! With the extra material that you cut off, you could use it to make a strap for their sack!
Can you imagine how fun this is going to look as the years go by! It will be full of cute halloween pictures and memories of their hand & foot size!
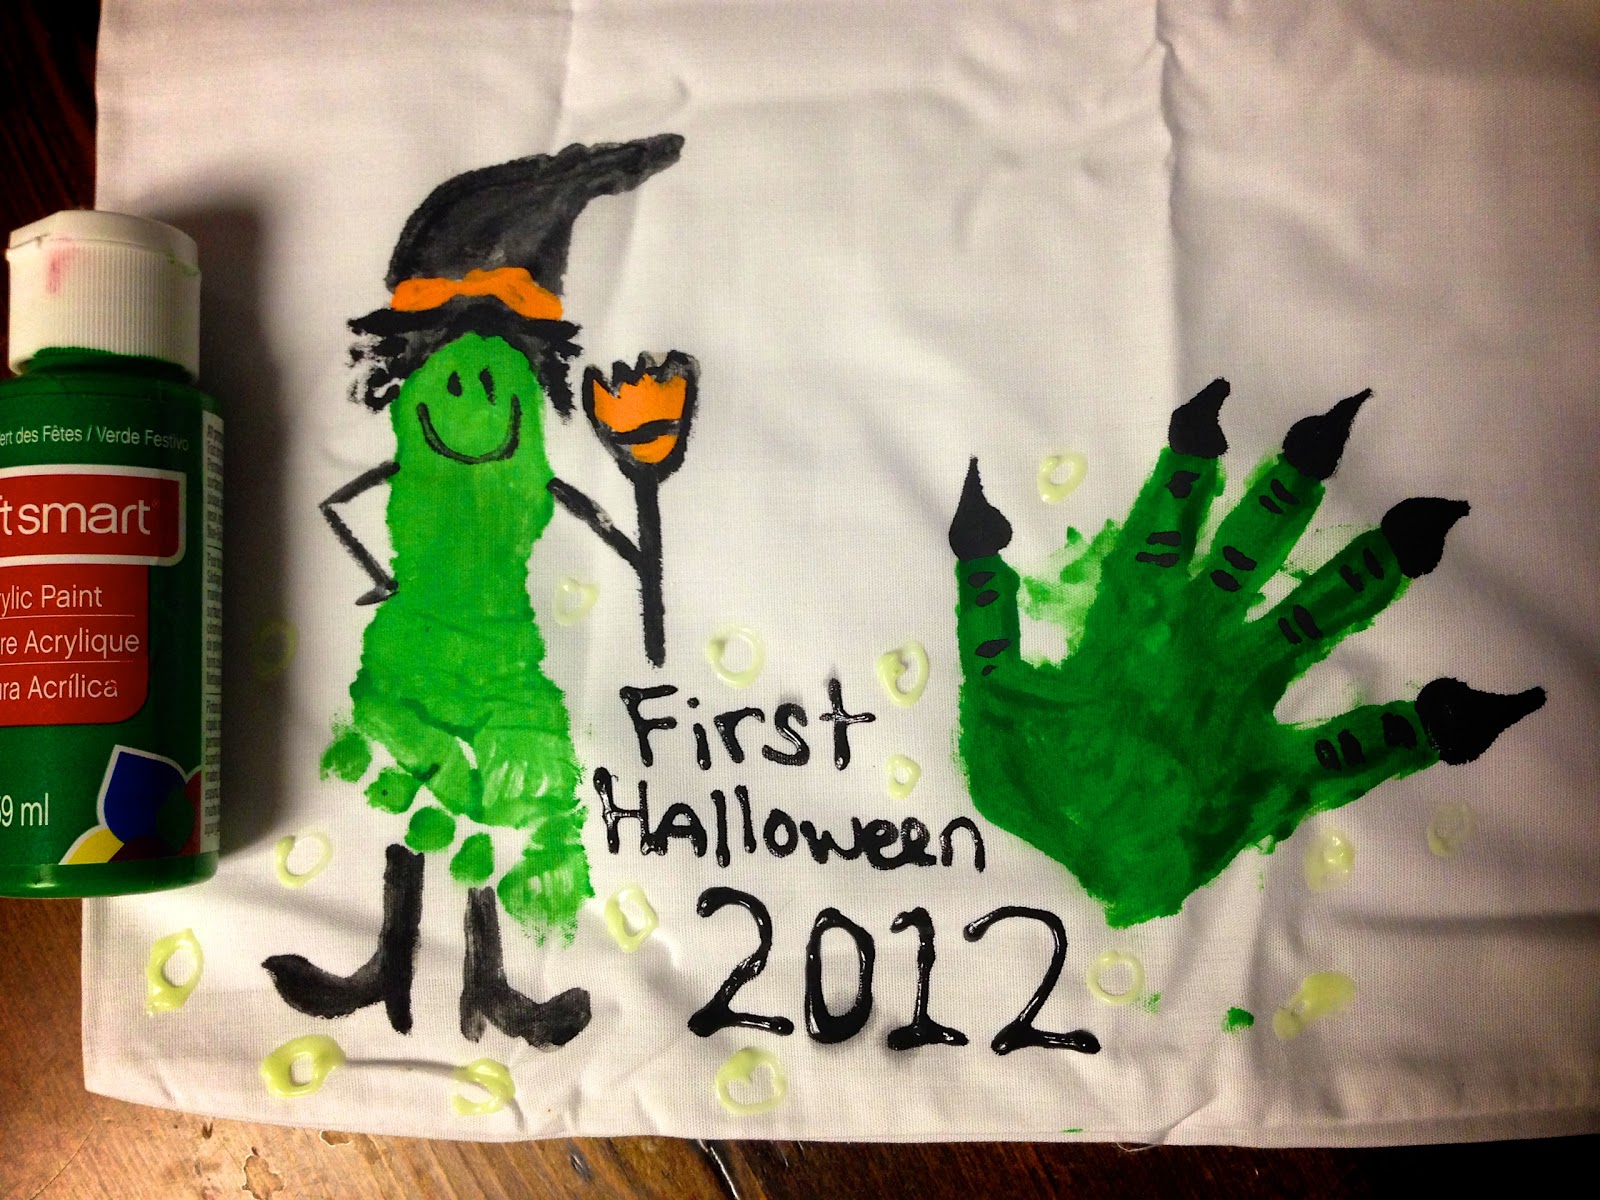
How cute did this turn out!?! Garren's First Halloween....
His footprint is smaller than an acrylic paint jar!

I pulled together some of the CUTEST ideas of Halloween hand and footprint art from Pinterest! Now just pick your favorite and get started! 
Witch HandPrint!
Bat Print!
Cat Print: Just paint on the cat face instead of making it!
Ghost Print! 
If your sack is white, like mine, just paint a square of black and let it dry. Then add the ghost print on top of it!
Spider Print!
These pumpkins are made by stamping your child's fist!
And if you want to make it visible for nighttime Trick or Treating....Use Glow in the dark paints!!!

Here is a follow up post that I did for this trick or treat sack! I decided to use who my children were dressing up as as inspiration to their hand/footprint for the year! Click on the picture below to go to the post!
Here is another follow up post of 2014 & 2015 to give you more ideas of how I came up with hand and footprints for the costumes my kids wore. Click one the picture below to see that post.

Here is one of the Footprints from 2016. Click on the picture to see the post!

Also, if you like this idea, you will love my Christmas Tree Skirt Keepsake! Just click on the picture below!

Tuesday, October 23, 2012

Rice Krispy Cupcakes and Simple Marshmallow Treats

My Kiki turned four yesterday! We were going to our moms group on her actual birthday and we wanted to bring a treat to share that we know everyone would be able to eat! Most of the children in the group are younger so I wanted the treat to be small, cute, and Gluten & PB Free!
The solution I came up with was SOOOO simple! 
They only take about 15 minutes to make AND that's with a child helper!
Here is what you will need:
  • 3 Tablespoons of butter(or substitute)
  • a package of marshmallows
  • 6 cups of Gluten Free Rice Krispys (you can use regular too!)
  • Candiquik (white melting chocolate)
  • Sprinkles 
  • Candy to make a "cherry" on top. You could use jelly beans, sixlets, gum balls, m&m's, etc.
  • Mini cupcake paper wrappers
Just follow the instructions HERE to make original Rice Krispy Treats.
Then get your hands a little wet with cold water so the mix wont stick.
Form into small balls that fit your cupcake wrappers.
Melt your chocolate in the microwave. It's very important that you don't over cook the chocolate! Every 15 seconds, pull it out and stir till desired consistency.
Then simply dip the top in your chocolate. We added one drop of red food coloring to make it pink.

   
Then immediately add your sprinkles and "Cherry"! 
They will stay good for a few days covered on your counter but best served that day or the next!
Another SIMPLE treat we made to share with other friends were these cute marshmallow pops!
Same idea as the rice krispy treats but just with a marshmallow on a cake pop stick!

      
These literally take at the most five minutes to make! You just need a piece of foam to stick the sticks in to let the chocolate dry!
 
Here is our Halloween version! 
My kids LOVE Candy Corn!!!!!
You could also leave out the stick and just put the decorated marshmallow into a small cupcake wrapper for a different look!

By the way, I JUST started a Facebook Page for my blog! I would LOVE it if you would support me by "liking" my page!!!!
HERE is the link!
THANK YOU!!!!

Saturday, October 20, 2012

Candy Corn Tree Centerpiece

This is my second year bringing out this cute centerpiece! I love it because it is great for TWO holidays, Halloween and Thanksgiving! Pumpkins are a perfect decoration to merge the two holidays together! It's a lot of work putting up decorations and then taring them down to bring out the next theme! Also, I love this idea because it helps get rid of all the extra candy from Halloween because your guests can enjoy! =) I call it a "centerpiece" but you can also place it in your entryway for people just stopping by!

Here's what you need:
  • A cute bucket or vase preferably pumpkin theme (I got mine for $2.50 at target last year)
  • a few rocks
  • a bunch of sticks
  • foil/press and seal
  • candy corn
  • hot glue
  • spray paint (black)
To get started, this is the best part! Go to a park or on a walk with your kids and have them find you some "special" rocks and sticks! I had to break down the sticks to make some of them fit the size I wanted! Then you are going to spray paint your sticks black, you don't have to use that color but I liked it best for Halloween! Gather the sticks together the way you want them and tape together at the bottom.

Then wrap the bottom of your sticks with foil and insert into your bucket! This helps to hold them in place!
Then add your rocks! These help to give the bucket some weight so it won't tip over!
   
Now, since you will be adding candy to the top, place a layer of press and seal or foil so there are no rocks showing!
Hot glue a few pieces of candy corn to the tips of the branches! When the branches are really thin, it helps to take two pieces of candy corn and glue the branch between them!
    
Now, here's the fun part! Fill your base with YUMMY candy that can be shared with family and friends around the holidays! We used candy corn and pumpkin spice kisses!
Or as I stated above, fill the base with leftover candy from Halloween!

My favorite part of this project was when my Kiki said,
"We make a great team Mommy!"
I just set ours out yesterday, we had our neighbors over, and I think the candy is almost GONE! =) They all got a kick out of it! The only problem you might have is with your own children constantly filling up on candy! I just threaten to throw it all out, which I have done before so they know I MEAN IT, and they stop! You could also spray paint your rocks black and just have those in the bottom if candy is a problem!
It's so simple to make and so cute to help decorate your house for the season!
You can also make fun homemade ornaments for the season and let your kids hang them on the sticks!

Tuesday, October 16, 2012

Pumpkin Chocolate Chip Minute Muffin

Ever since my boy has started going to school ALL day, I have experimented with healthy breakfasts that will keep him full till he gets to lunch. Of course it also has to taste good or I would have a very unhappy boy every morning! He never complains about how hungry he is when I give him these muffins in the morning and he LOVES the taste!
I started blogging about these microwave minute muffins a while back! They are so easy to make, healthy, and really YUMMY!!!
Over the months we have experimented with many different combinations of this muffin! It's fun to ask my children what they feel like adding to their muffin each time we make them. Here is my first post on the Morning Muffin & I also posted about a Carrot Cake Muffin!
Naturally, I had to experiment with pumpkin and come up with my FAVORITE combination, Pumpkin Chocolate Chip muffin!
Here is what you will need:
  • 1/4 cup of flour (any kind)
  • 1/4 cup of ground flax
  • 1 egg
  • 1/8- 1/4 cup chocolate chips
  • 2 Tablespoons pumpkin puree
  • 1 Tablespoon milk (or substitute)
  • 2 teaspoons of sweetener (I use maple syrup)
  • 1 teaspoon Coconut oil (or butter)
  • 1 teaspoon Cinnamon 
  • 1/2 teaspoon Baking Powder
  • pinch of nutmeg *optional
  • pinch of cloves *optional
  • 1 Tablespoon yogurt plain/vanilla *optional
  • 1 Tablespoon of chia seeds *optional
  • Grated Carrot *optional

 Simply mix all of the ingredients together in a large mug and throw in the microwave for 2 minutes!
Make sure you mix all the dry ingredients well. It helps me to add the wet ingredients to the mug first.
If you add the optional yogurt, your muffin might need an extra 30 seconds in the microwave because of added moisture!
Then dump on a plate, cut up, and eat!
      
No matter what muffin I make I alway shave two baby carrots in it! I love the added nutrition!
 Another ingredient I always add no matter what muffin I am making is Chia seeds. They are normally pretty expensive, however, Trader Joe's is now selling a 5.3oz bag for $4.99.
Here is a little more information about the health benefits of Chia seeds:

  • Chia seeds are hydrophillic, meaning then can absorb over 10 times their weight in water. This makes them great for hydration, as they absorb the water we drink and hold it in our bodies.
  • Eating chia seeds slows down how fast the body converts carbohydrates into simple sugars. This leads scientists to believe chia seeds may have huge benefits to diabetics.
  • Chia seeds have 5 times the calcium of milk, 2 times the potassium of bananas, 3 times the iron of spinach and 3 times the antioxidants of blueberries!
  •  Chia seeds have more omega-3′s than flax! And, unlike flax, chia seeds do not have to be ground to be digested and can be stored for years without going rancid.
  • 19-23% of the seed’s weight is protein. Like quinoa, it contains a complete amino acid chain, giving your body complete protein on par with meat or eggs.
  • Chia seeds reduce your cravings for sweets and junk foods because its high levels of soluble fiber allow for a measured release of unrefined carbs into the bloodstream. This is the opposite of a sugar rush and crash which creates more cravings.

Friday, October 5, 2012

The Avengers Homemade Hawkeye costume: Vest

OK everyone!!! I finally got to making the "vest" for the Hawkeye Costume!
I tried to make it as simple as possible and keep it low cost!
At first I was going to look for a hoodie or something that already had a zipper sewn into it but then I thought, the zipper doesn't really have to work! I figured my son was just going to wear a black tank top, so why not just put some finishing touches right onto the tank!

Here is what you will need:
  • A black tank top (you can find these as undershirts or dye a white tank top undershirt with black dye) Also another idea would be to cut the sleeves of a black t-shirt because they are much easier to find!
  • A piece of Maroon Fabric that has the width of the tank (I got 1/2 yard)
  • More black fabric, same as used for finger glove and quiver strap (I got 1/8 yard)
  • A zipper that stretches the length of your tank
  • Steam-A-Seam2 
  • needle and black thread

The first thing you are going to do is attach the maroon fabric to the front of the tank. If you have a sewing machine you can use that. I used Steam-ASeam2 to basically fuse the fabrics together by ironing.  I showed how to use this stuff in another blog post, click HERE to see what to do! This stuff is GREAT for so many things!!!
 Here is the pattern I ironed on to the tank! 
 I then added the second pattern onto the tank! I used the zipper to draw it out!
   
 Here is the tank top with the maroon fabric ironed onto it!
 I then took my needle and thread and hand stitched on the seam of the two pieces of maroon fabric. This was just for looks! You don't have to do this but I think it helps to bring out the design!
   
I then hand stitched the zipper to the middle of the tank! This zipper is fun because it really goes up and down! I wished I could have gotten one just slightly longer but they didn't have one with a silver zipper!
   
 Next you are going to make the shoulders of the "vest". I showed you the basic measurements below of my son's top but this probably will be different for everyone. It's also not crucial to be exact!
I made two sleeves with the black leather fabric used before in other parts of the costume!
The basic idea is, where your fabric comes to a point, that is the fold between the front and back of the tank. I sewed along the folded edge but you can just simply cut it if you don't care about the edge look.
   
 Here is the picture of how I put the sleeves on. I first put a little bit of hot glue between the fabrics to keep them in place and then I hand stitched around the edges.
 Here is a close up to show you the hand stitching.
 Then turn the tank over and do the same thing.
There you go, a simple way to make a Hawkeye top for your costume!

Click HERE if you want to see how to make the whole Costume!
Related Posts Plugin for WordPress, Blogger...