My daughter Kiki always has BIG ideas for her birthday parties! Last year she wanted a princess party with a pink princess castle! Here is what I created for her! You can click on the picture below to see the process and other things I did for the party!

This year she wanted a Jungle theme party where all of the kids invited could pretend to be animals in a HUGE cave!!! She got a Panda costume for Halloween the year so that is what she dressed as! Here is the process of what we did to make our little girl's birthday dream come true! First, we picked up a bunch of free boxes from a furniture store. A tip about making large cardboard structures is that if you open the box up it covers a lot larger area!
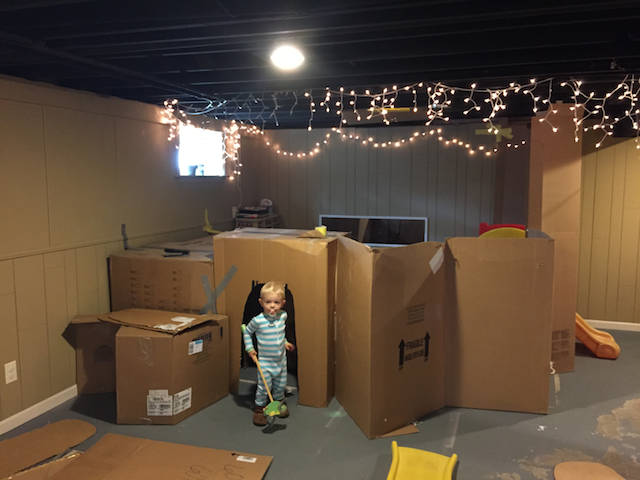
We started moving the boxes around to come up with our design. I wanted to put it in the same corner we put the castle in and also have a large area on the inside that the kids could stand up in and play.
I think we had about 17 kids total at the party which is why I wanted an open area inside, so everyone would be able to play!
 |
We figured we would make one way in and one way out... The kids would have to crawl through the caves to get into the larger area and my husband came up with the idea for the kids to slide out of it!

Here is the beginning of the cave that the kids could crawl through.... at first we just taped the boxes together and to the wall to hold them in place... then my husband cut the openings afterwards! |
Here is a picture of what the inside of the cave looks like before the outside structure of the cave is done!
We opened up the boxes and used duct tape to tape the walls together and the cardboard to the floor!
If you want your boxes to hold, you want to use GOOD and STRONG duct tape.... not cheap stuff!
Here is the basic structure of the cave just in boxes!
We then attached cardboard to the ceiling to cover up the opening so no one could see in! We also added another cave to crawl through on the right of the cave opening!
Once all of the cardboard was in place we used about 6 rolls of brown packaging paper, which I got from the Dollar Store, to cover it up. We unraveled the whole roll of paper and crumpled it up to give it more of a "rock" look. Then we taped or stapled it to the cardboard. *tip* After all this work we realized that the cheapest and best tape to use for the outside packaging paper is clear packaging tape...
Next, I transformed one of the posts downstairs in the basement into a tree! I used green tablecloths from the dollar store to make the "Leaves". I just taped them to the top of the post and then to the ceiling after stretching them out!
To make the pole look more like bark, Kiki and I painted Trader Joes shopping bags a little darker brown, ripped the bottom edges a little and stapled/taped them around the pole!
I then added a Dollar Store white and green table cloth to the wall to make the jungle scene extend on the wall a little!
I finger painted, with acrylics, some vines and leaves to the top of the white table cloth!
I drew two monkeys on regular paper and had Kiki help me color them. Then we cut them out and taped them to the table cloth!
We also added another little cave to crawl in over by the slide! This one had a bunch of blankets in the bottom so it was nice and soft inside!
This is a picture before it was all covered with brown paper!
I then added green crepe paper hanging from the ceiling like green vines. I wanted to show you what it looked like before and after I crumpled the crepe paper! When you crumple it up a little, it makes it look more like vines!
The kids love sliding out of the cave into the vines!
I also added crumpled crepe paper vines in front of the cave to add a little color....
I made a cute little sign to go on the front with some scrapbook paper that says "Kiki's Kave"!
Here is the finished Cave!
We had a few games planned for the kids!
The kids were having so much fun playing that we only really got to do the big scavenger hunt.
Here is what we did!
We had the kids decorate brown paper bags upstairs with markers and stickers while two older kids went down to the cave area to hide plastic animals that I picked up from the dollar store!
We had a bunch of different jungle animals like this and there was one hidden for every child!
They got to keep their animal as part of their party favor!
The simple rule was to find an animal and then help the others who haven't found one yet!
It was great and no one felt left out, which definitely can happen with this many children!
They sat down on the floor in front of the cave after they found their animal.
After everyone showed that they found an animal, they earned a safari map to find their treasure!
I drew a basic outline of our house and property on brown paper and burnt the edges to make it look old! I drew "you are here" and circled it in red and then we drew a dotted line to follow to find numbers 1 through 4 in our yard which then lead to X marks the spot!!!
It was such a BEAUTIFUL fall day! Here are the kids running to find #2 on one of our trees!
The X lead the kids to the treasure box piñata!
I normally don't let my kids have a lot of candy.... so a Piñata was Kiki's BIGGEST wish besides the cave!!! So this was a special event!
Here is the birthday girl taking a swing!
We also made this cute pin the tail on the Giraffe game which we didn't get to play till most of the kids left.
If you haven't seen my posts before on this....I LOVE Staples for their engineering prints!
My husband photoshopped a picture of Kiki sitting and put her on a free giraffe coloring page we found online!
If you don't know how to photoshop you can simply just use any free coloring page of the jungle animal of your choosing and have it printed for just a few bucks! The poster was HUGE! It was 36"X48" and only $7.76!
I added the two other posts I have done on Staples Engineering Prints if you want to find out how to do this for yourself or for one of your parties! Just click on the picture and it will take you to the post!
*One other game idea for your Jungle Theme party is Jungle Animal Freeze Dance. All you do is play music and when it stops yell out an animal name and the kids have to freeze like that animal!